Please carefully follow the instructions below to select, package, and mail the plant disease specimen. The accuracy of diagnosis depends upon the quality of the information provided, the plant material selected, and the condition of the specimen when it arrives at the Plant Disease Clinic.
Submission Forms
Collecting a Sample for the Penn State Plant Disease Clinic
Checklist: Did you…
- Fill out the Specimen Information Form thoroughly and for each sample
- Select a large enough specimen with symptoms
- Read the appropriate submission instructions (below) for the type of specimen being submitted
- Package the contents correctly, using dry paper towels if needed, enclosing any roots, and placing them in a plastic bag
- Protect the sample with newspaper, cardboard or other material to inhibit crushing if necessary?
Specimen Information Form
- Complete the Specimen Information Form as thoroughly as possible
- Fill out a separate form for each plant specimen submitted
Commercial growers: Please note in the 'Additional Comments' area of the clinic specimen information form if you suspect that the sample being submitted could contain fungal toxins (such as found on moldy wheat or corn samples, or moldy paper containers used in greenhouses), or could harbor a USDA‐APHIS designated select agent (such as Ralstonia solanacearum, race 3, biovar 2 or soybean rust).
Selecting and Packaging Plant Material

Correct Packaging
- Select plants showing symptoms of concern
- When possible, send several plants showing a range of symptoms
- Avoid sending dead, dried samples
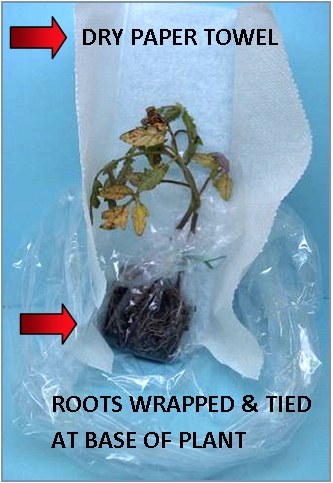
When possible, send entire plants including roots
- Place root ball in plastic bag and fasten around stem
- Place dry paper towel around leaves
Vegetables and Fleshy Fruit Samples
- Select firm specimens that show early and intermediate stages of disease
Leaf, Stem and Branch Samples
- Send several affected parts
- Cut stem/branch samples so that a short piece of live, healthy tissue is attached to the diseased portion
- Wrap the specimen(s) in a plastic bag with a few small ventilation holes
Root Samples
- Collect 1-2 cups of roots from multiple locations around the plant
- Select a mix of large and fine roots
- Sample symptomatic and live roots
- Package the roots with a small amount of soil in a plastic bag, making sure to package roots separate from foliage
Dutch elm disease, Verticillium wilt, and Oak wilt specimens
- Select specimens from branches having wilted, yellowing or dying leaves
- Cut and send several branch sections that are ½ to 1 inch in diameter and about 6 inches long
- Wrap in aluminum foil to prevent drying; do not allow samples to be exposed to high temperatures
Turfgrass
Please do not send completely dead turf grass
- Collect two or three squares (each 3x3 inches square), with at least one inch of attached soil and roots, from the edges of affected areas
- Include both dying and apparently healthy plants
- Wrap each sample in one thickness of slightly dampened newspaper or paper toweling, then in dry newspaper. Aluminum foil can also be used to wrap turf samples
- Turfgrass diseases can be very difficult to diagnose accurately, so include as much information about the problem as possible
Mailing Specimens
- Use strong containers such as corrugated cardboard boxes or mailing tubes that will not crush in transit when mailing large samples
- Fill empty spaces in mailing cartons with crushed or shredded paper to strengthen the carton and protect specimens
Mail to:
Plant Disease Clinic
The Pennsylvania State University
361 Science Drive
Room 220
University Park, PA 16802
Other Plant Pathology and Environmental Microbiology Diagnostic Services:
Nematode Samples:
The Penn State Nematode Diagnostics Lab offers nematode identification services for plant and soil samples.
- Phone: 814-865-0717
- Email: nematodelab@psu.edu

